Continuous is a .NET IDE that supports coding in C# and F#.
In many ways it is similar IDEs you already know and love like Visual Studio and Xamarin Studio. It supports scripts and projects and a code editor with code completion and semantic highlighting.
But Continuous differs from traditional tools in that it breaks the old Code-Compile-Run cycle by continuously compiling your code and continuously running it. No more F5, your code is always running.
This change has been made for two reasons:
I hope you find coding in Continuous to be an educational and useful experience.
This documentation will guide you through becoming a pro Continuous user, thank you for taking the time to read it.
Projects are either Scripts or collections of code files called Apps or Libraries.
A Script is a single code file that runs from top to bottom.
Scripts can contain all the normal things you find in code files, but also contain global statements to be executed (usually C# code does not contain these).
Scripts are a great tool for writing small apps and are a great place to start with an idea.
When your script becomes very large, it is best to split it into multiple files using projects.
Scripts are supported by both C# .csx files and F# .fsx files.
using static System.Console;

WriteLine("Hello World!");printfn "Hello World!"When your scripts become large, it’s best to break them up into multiple files. This is done using .NET project files.
Projects are classified into two groups:
In the .NET world, apps are .exes and libraries are .dlls.
Although Continuous makes a distinction between these two types of projects, in practical use, you can work with either project type in the same way. This is thanks to the always running feature of the tool.
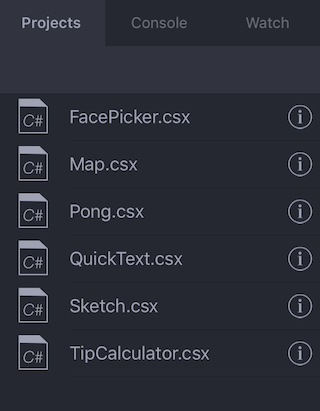
Continuous maintains a list of opened projects (scripts or libraries) that you are working on. These are shown in the Projects tab.
(This list is different from your “opened files” that the code editor maintains.)
When you run Continuous for the first time, the example scripts are automatically opened.
When you tap on an entry, one of two actions will occur:
If the project is a script, the script will be opened in the editor.
If the project is an app or library, you will navigate to the list of items contained in that project.
If an item is a code file, tapping it will open it in the editor. Projects can also contain folders. Tapping a folder will navigate you to see the folder’s contents.
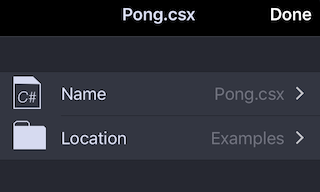
Activating the info icon ![]() on a project item
allows you to
rename and move that item. This works for both files and folders.
on a project item
allows you to
rename and move that item. This works for both files and folders.
To rename a file, tap its Name and simply enter a new name.
To move a file, tap its Location and you will be presented with a folder selection screen.
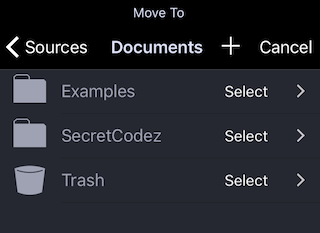
To pick a new location, tap Select on a folder.
Create new folders using the add icon ![]() .
.
To create a new script, tap the ![]() in the top
left corner of the app. You will be presented with a template selector:
in the top
left corner of the app. You will be presented with a template selector:
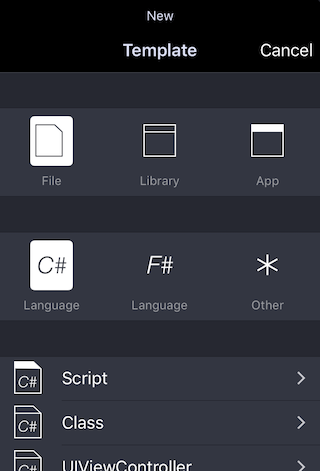
This screen allows you to pick a template for the type of project you want to add. The list of templates is at the bottom with the arrows. You use the top two sections to filter that list.
Once the desired template is found, tap that template to choose a name and location for the project.
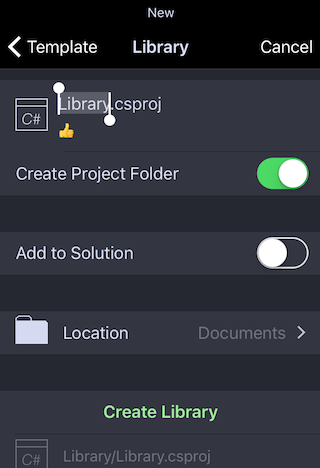
At this point, you will have a variety of options to control where the project is put, what it’s called, and if you want a solution.
Solutions are groupings of projects and aren’t needed in Continuous but are supported for all you professionals out there.
Once you are happy with the options, press the Create button to create the files.
The project will be automatically opened in the Projects Tab for you.
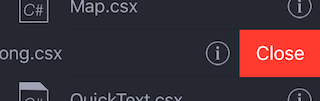
To close a project, swipe left on it in the Projects Tab and choose Close. Note: although this button is red, your file is not being deleted, it is just being removed from the open list.
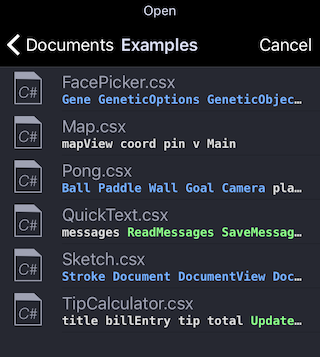
To open an existing project, tap the open icon ![]() in
the top left corner of the app. This will present the file selector:
in
the top left corner of the app. This will present the file selector:
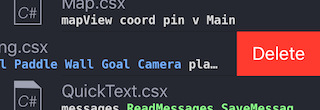
Deleting files is only available in the file selector available through the
open icon ![]() . Once in the selector, you
can swipe left on a file to delete it:
. Once in the selector, you
can swipe left on a file to delete it:
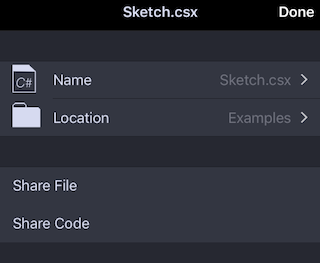
To share a file, tap the info icon ![]() on a project item.
on a project item.
There are two ways to share a file:
When you choose on of the share options, the standard iOS share sheet is presented and you can choose where to send the file or code.
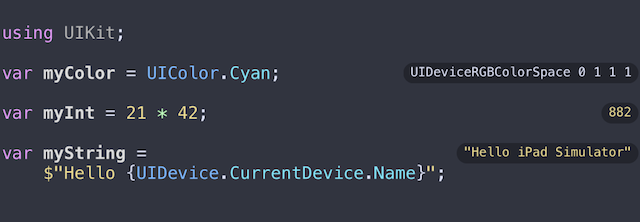
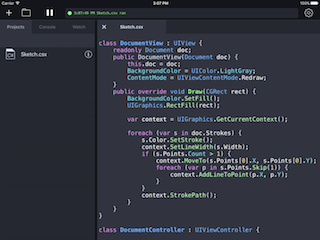
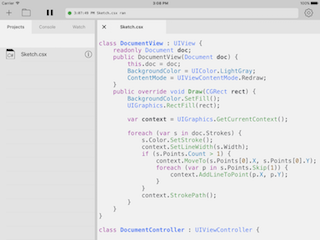
When you edit code, Continuous automatically compiles and tries to run that code.
If you do not have Auto Run enabled, then you can run code by pressing the Play Button.
What runs depends on you:
If you are editing a script, then that script will run every time you edit it (and you’re not paused).
If you are editing a source files (.cs or .fs), then only the data
you have selected in the Watch Tab will be generated.
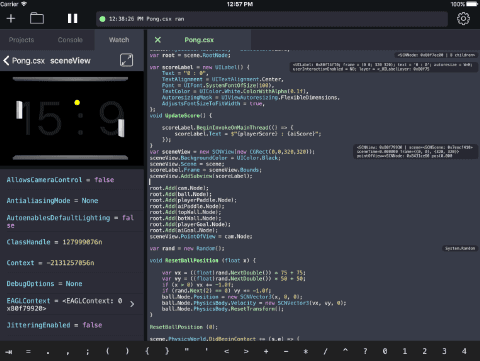
The results of running your code are shown in the Watch Tab.

The Play button runs your code. If you press it while the code is already running, the last execution will be cancelled.
The Play button is drawn as an outline when there is nothing to run (no file is being edited). It will be filled in when something can be run.
If you have Auto Run enabled in Settings, then you usually do not need to press the Play button since your code will run whenever you edit it.
Automatic running of your code makes development very efficient, but it does have its drawbacks.
When typing new code, it’s possible to accidentally make inifinite loops. This obviously creates trouble for Continuous. In some circumstances, it can recover (at which point you should immediately Pause the app). In other cases, it’s your best bet to kill and restart Continuous, then reopen your file with the app paused.
To avoid infinite loops, use high-level libraries like System.Linq in C#.
If you perform a lot of network access, then you will use the network everytime you edit the code. When writing code that uses the network, it’s best to leave the app paused while you do the majority of your coding.
If your app does a lot of work on the UI thread (creating a lot of objects, or involves a lot of animation), then that work will be performed whenever you edit code. If you notice the editor slowing down, then you might want to pause the app for a bit.
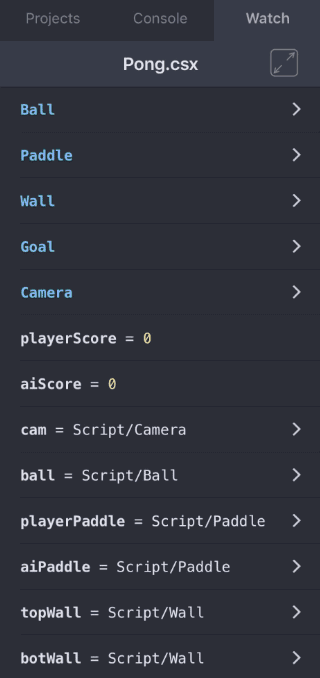
The Watch Tab is where your code comes alive. It lists the types and objects that you declare in your code and allows you to inspect those objects just as if you were in a debugger.
The watch tab starts out displaying the global defintions in the file you’re editing.
You can navigate the items in the watch list by tapping them.
When you select an object, the following will be displayed:
An interactive visualization of the object if it is a user interface object.
All your UIKit.UIViews and UIViewControllers will be displayed along with
Xamarin.Forms.Pages and Views. These objects are live and interactive!
You can resize the visualization by dragging the split bars in the application.
A list of all public properties, fields, and no-argument functions for that object. This allows you to dig deeply into a graph of objects.
If the object you select is a Type then you will be given the ability to
create a new instance of that type.
This feature allows you to view objects even if you have only declared types. This is a very useful feature when you’re creating libraries of controls or just want to focus on one part of an app.
If you are watching an object with a visualization (a UI object), then you
can switch to full screen mode by tapping the full screen icon ![]() on the Watch Tab.
on the Watch Tab.
This mode is useful when writing games or other large interactive applications.
When in full screen mode, a small floating button will be placed on top of your UI. This button allows you to return to normal mode. You can drag this button to get it out of your way, but don’t lose it or you won’t be able to get back to normal mode!
If you are writing a script and want to always watch the same type or object,
then name it Main. If the watch tab sees a Main type or object, it will
display that by default instead of the global declarations.
This feature is used in the [example][Examples] scripts to make the app start on the main screen in the watch tab.
class Main : UIViewController { }var Main = new UIViewController();type Main() =
inherit UIViewController()let Main = new UIViewController ()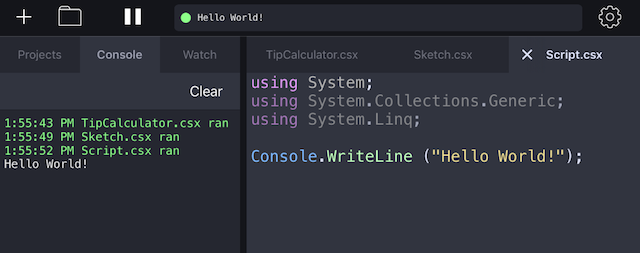
The Console Tab displays displays System.Console.Out and
Console.Error as continuous text.
It also displays build and run information from Continuous so you can tell where one execution began vs. another.
The last line of the console is mirrored in the top toolbar of the application.
The console also automatically scrolls to the last line when one is printed.
There is no way to input data to Console.In.
You can print to the console using all the normal .NET techniques.
using static System.Console;

WriteLine("Hello World!");
Out.WriteLine("And the Universe!");open System
printfn "Hello World!"
Console.WriteLine "Hello Mars!"
Console.Out.WriteLine "And the Universe!"To clear the console, tap the Clear button under the tab.
The code editor works just like all text editors on iOS and has these special features:
Your edits are automatically saved 3 seconds after your last edit.
Continuous uses the following coloring rules when highlighting your code:
| Code | Color |
|---|---|
| Arguments | White/Black |
| Enums | Light Blue |
| Events | Yellow |
| Fields | White/Black |
| Locals | White/Black |
| Methods | Green |
| Numbers | Yellow |
| Properties | Light Blue |
| Strings | Yellow |
| Types | Blue |
The value of variables as would be seen in the Watch Tab are shown inline in the text editor justified to the right side of the screen.
These are valuable when writing scripts without UI and as a quick debugging aid while coding.
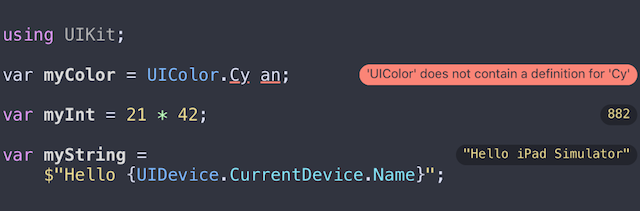
When Continuous detects an error or warning in your code, it will:
These bubbles make it easy to find errors in your code and fix them.
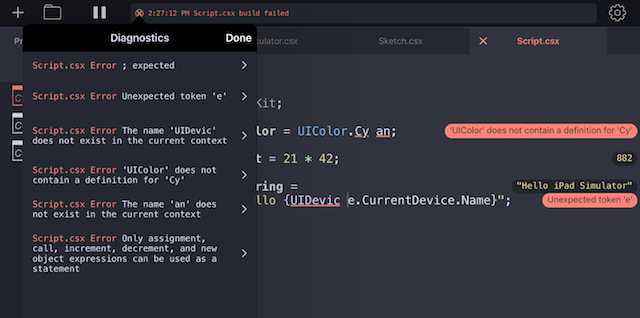
While the error bubbles are great for diagnosing problems near where you’re editing, sometimes edits cause errors in distant locations or even other files.
When this happens, you will want to invoke the Error List by tapping the single-line console at the top of the screen. This will show you all of the errors in the project and allow you to quickly jump to any one of them.
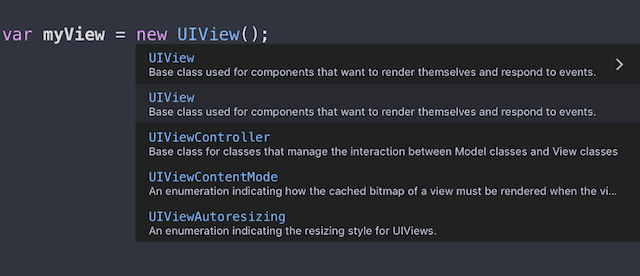
Continuous delivers the great code completion that you expect as a .NET developer. It displays the closest case-insensitive match to members and global types. The list of completions is also sorted based on the hierarchy of the type - more specialized members are shown before more general.
Note The code completion window is only available on iPad. On the iPhone, you still get completion thanks to the Keyboard Accessory.
The completion window is shown automatically whenever the cursor is inside an identifier and tracks the cursor automatically. You can scroll the completion list by dragging and flicking.
The current completion is highlighted in the window. If you press Return, then that completion will be automatically inserted. Alternatively, you can tap any completion to have it inserted.
If summary documentation is available for a symbol, it will be displayed underneath the declaration. Continuous contains over 60,000 such documents for various APIs.
The completion list will also show the current symbol at the top of the list.
This is provided as a quick way to jump to documentation for that symbol.
The current symbol is differentiated by a an arrow >.
The current symbol may seem redundant at first, but becomes useful when trying to remember method argument order and as a general aid.


The keyboard accessory floats above your keyboard and gives you quick access to:
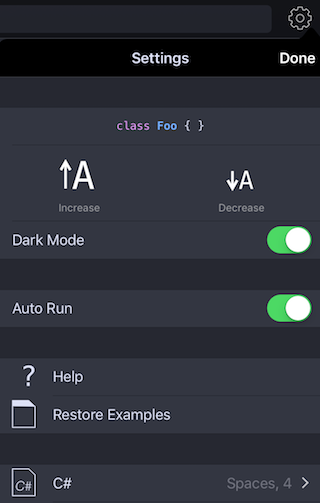
The Settings is shown when you tap the gear icon in the upper right corner of the app.
Quickly change the font size by tapping the up or down arrows.
Continuous can be displayed in either a Dark Mode (if you’re a millenial) or a Light Mode (strong-eyed).
When Auto Run is enabled, your project will be automatically re-run and the Watch Tab will be updated whenever the project successfully compiles.
This mode makes editing interactive apps fun and efficient but has its drawbacks. See Auto Run Tips for details.
If you disable Auto Run, then you can simply tap the Play Button to re-run your project (assuming it built successfully).
Auto Run is enabled by default.
Presents this Help.
If you edit the examples, you can restore orginal versions of them by tapping this command.
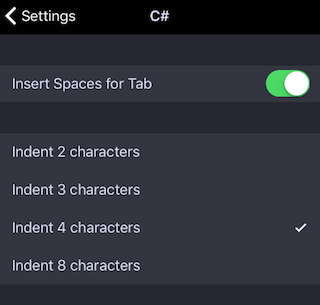
You can control the behavior of the tab key on a language by language basis.
You can choose to Insert Spaces instead of tabs, and you can control how many spaces.
Continuous defaults to always inserting 4 spaces.

Continuous integrates with Visual Studio to provide live previews of your app as you code it.
In order to communicate with Continuous, your iOS device must be on the same WiFi network as your computer.
If you are using a proxy, make sure it does not block any ports.
When successfully paired, Continuous will display “Connected!” in green in the status section.
To use Continuous to preview your apps, you must first select the paired device in the execution target list on the main toolbar. Continuous will appear as “[Device Name] Player”.
There are two ways to preview your app.
Run the whole app by running with or without the debugger. This will launch your app and execute the app delegate’s events.
Previewing a single view by choosing the menu “Run”, “Live Run Current View”. This is convenient for working on parts of your app in isolation.
Getting a .NET IDE onto iOS hasn’t been easy and some features had to be removed.
C# 7 is supported with these limitations:
F# 4 is supported with these limitations:
When Continuous runs code, if has the follow limitations:
Overriding platform methods is only supported on some classes. (You can override your own code as much as you want.) Overrides are supported on the commonly overriden classes, but not all.
Only some platform interfaces can be implemented. (You can implement your own interfaces without limits.)
System.Reflection is supported but external binary libraries that depend on reflection may not work.
Continuous automatically catches exceptions in overridden methods and in delegates. This is done to prevent the app from crashing as a result of an unhandled exception. This means Continuous apps behave differently from mono/.NET apps when throwing exceptions from delegates of overridden methods.
Thank you for reading this manual!
If you have any further questions, hop on over to the Continuous forums.